Your solution? An outdoor kitchen! These structures can help you slow down and spend more time with family and friends by putting all the ingredients for outdoor dining close at hand.
Types of Outdoor Kitchens
Outdoor kitchens can be as simple as a storage cabinet for cooking gear or as ambitious as a full kitchen with grill, refrigerator, sink and eating area. Either way, your yard will gain an outside “room” that’s a natural gathering spot. Here are the three types of you may consider:
Grill Maintenance 101
Movable
A smart choice for small spaces that multitask—as cookout central one day and a garden hub the next. Start with a portable charcoal or gas grill fitted with heavy cast-iron or stainless-steel grates and an easy-to-clean grease trap. For storage and counter space, add a rolling cart with shelves. To avoid serving burgers tartare, buy a clip-on grill light.
Prefab
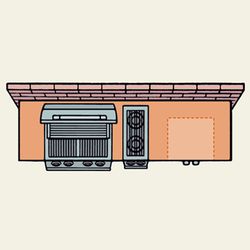
An all-in-one option for folks with more square footage and cash to spend. The basic setup (shown) typically includes a stucco-clad 5-foot island with tile counter, drop-in gas grill, and access doors for a propane tank. Extras, including granite counters, a refrigerator, and LED lighting, are ordered a la carte. DIYers can get cooking with a prefab island on delivery day.
Custom
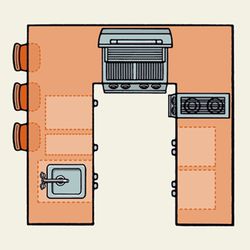
A built-in-place kitchen, whether crafted by a pro or a handy homeowner, offers integrated appliances, storage, and counter space, as well as the most flexibility in terms of matching the kitchen’s materials and style to its surroundings. A larger layout, extensive lighting, in-ground utilities, and a pergola-style roof add convenience but also raise the price.
Building an Outdoor Kitchen: Before you begin
Do you need a permit?
Some towns don’t require one for prefab grill islands. But to eliminate any guesswork—and ensure that your project won’t trigger a tax hike—opt for a movable kitchen with a rolling grill, a cart, and an outdoor extension cord for electricity.
Power requirements
Electric, water and natural-gas lines usually are brought to the outdoor kitchen from the service in the house. Besides providing power for the kitchen lights and refrigerator, electric outlets should be included in plans for the cooking and dining areas. (Outdoor outlets require ground-fault circuit interrupters.) Check local codes for regulations on burying electric cable and gas lines. In many areas, the two must be buried in separate trenches, though some areas require only that the two be separated. Ask your building inspector to explain what’s needed.
Plan ahead to prevent fires
Here’s how to ensure your new cook center won’t endanger you—or your home: Grill: Position it at least 10 feet from combustible materials, such as wood siding, deck rails, and tree branches, and build in storage for a fire extinguisher. Gas: Check the line for leaks. Mix 1 part dish soap to 2 parts water. Brush the solution on the hose and connector fittings. Turn on the gas, but don’t light the grill. If new bubbles form, you have a leak. Tighten the fittings; if that fails, replace the hose and fittings. Electric: GFCI outlets are required; it’s also good to put the kitchen on its own circuit, one that’s easily accessible via the control panel in your house. Use only extension cords, fans, and lights that have Underwriters Laboratories (UL) outdoor ratings, because they stand up to UV exposure and extreme temperatures.
Building an Outdoor Kitchen: Step-by-Step Guide
1. Select an outdoor kitchen style
Be sure the style you choose will matches your lifestyle and will accommodate everything you want the kitchen to hold (especially the grill!) Here are some typical styles to consider:
Traditional
A masonry base in the form of mortared brick and stone is classic. To tie it in with the house, choose a material and design, such as this running-bond brick pattern, that echoes your foundation walls or chimney.
Contemporary
The style is characterized by sleek lines and polished finishes, such as granite and stainless steel. Here, ipe boards running in horizontal bands give dimension to the kitchen while also blending it with the wooded backdrop.
Rustic
Texture and matte finishes impart a lived-in look. Here, stucco on the built-in base is tinted to mimic terra-cotta and to harmonize with the tones of a rough-stone counter. Earthy colors blend with the surrounding plantings.
2. Choose a location close to the house
The side of the house can be an ideal location for an outdoor kitchen. There’s no need to excavate trenches for gas and electricity lines, and the house itself provides some shelter for the appliances. And when yard space is at a premium, an open space along the wall of the house might be the only spot available for a permanent kitchen.B Here are three reasons to build your outdoor kitchen close to your home:
3. Decide on the cooking area
To create a good-looking and efficient kitchen, follow these rules of thumb:
4. Pick your building materials
Material options for a built-in base
Cultured-stone veneer: Mortared to a wood, concrete-block, or precast-concrete frame, it looks like and lasts as long as natural stone but is simpler to DIY because it’s lightweight and easy to cut. Brick: Affordable and a cinch to maintain. Requires careful prep, and you may have to cut bricks to fit. But if you’ve got basic masonry skills, it’s a good weekend project. Stucco: Troweled onto a wood, concrete-block, or precast-concrete frame, it’s a hard-wearing and flameproof finish that comes in colors.
Material options for cabinetry
Stainless steel: It’s durable and weatherproof and matches the grill. Marine-grade polymer: Has the charm of painted wood, but won’t rot and is maintenance-free—just hose it down to clean it. Teak: Offers a warm, classic look. Must be finished annually with a clear sealer.
Material options for countertops
Granite: Stands up to the elements, won’t stain as easily as marble, soapstone, or slate, and shouldn’t fade in the sun. Concrete: Concrete countertops lend a clean, contemporary look but can be prone to cracking if not properly installed. Not DIY-friendly. Must be sealed and resealed annually. Outdoor-rated ceramic tile: Thrifty, good for DIYers, and offers a range of styles and colors. Best in regions where freezing and thawing won’t damage grout lines.
5. Consider adding some nice-to-have extras
They’re not necessities, but they make cookouts more enjoyable
Sink: The ease and sanitary benefit of washing hands and veggies without schlepping inside makes it worth the investment for not just the sink but also for plumbing and waste lines. Dedicated gas line: If you have natural gas, run a line from the house so as not to struggle with a propane tank or run out of fuel during a BBQ. Extra burner: Ideal for side dishes. Some grills come with one, but be sure there’s enough space to fit your pots. Refrigerator: A stainless-steel undercounter unit keeps cold drinks and ingredients within reach of the grill.
More add-ons to consider
Deep fryer: large capacity handles finger foods and the Thanksgiving bird. Kegerator: A keg on wheels that moves the party right to the grill. Tripod-style burner: High firepower boils deep pots of crustaceans. Pizza oven: Authentic wood-fired dome serves up a rustic slice. Smoker: Propane provides the heat and wood chips make the smoke. Ice maker: A no-plumb chiller relies on a water reservoir to make cubes. Portable heater: Stay warm and extend the BBQ season a propane unit; no electricity required. Wheels make it easy to move. Fold-up bench: Storage shelves, a lattice back for hanging utensils, and ample counter space make this collapsible fir potting bench an ideal bar or serving station. Dual-use fan: Keeps skeeters at bay while the breeze and built-in misters keep you cool. Rolling cooler: Supplement a fridge or forgo one entirely with this powder-coated 80-quart cooler that wheels up to the grill, then locks in place. No-plumb sink: This wall-mount vessel hooks up to a hose to create a cold-water washing station. Divert wastewater to garden beds with a second hose.
6. Add roofing/coverage
Pergola
A cedar or pressure-treated wood pavilion runs $5 to $15 per square foot. A slatted or lattice roof offers ventilation, but for more coverage, top with clear acrylic or galvanized metal.
Awning
For a kitchen off the house, a simple-to-retrofit option is an awning, from about $500 for an 8-foot-wide manually operated model.
Umbrella
For a movable kitchen, get a sturdy and versatile cantilever style with fiberglass ribs and a 50-pound base to withstand wind; $200 to $300 for both. For a built-in kitchen, consider adding a hole in the counter through which to slip the umbrella post.
7. Determine your dining set-up
Family gatherings: Plan seating for six to eight around a table that’s about 96 inches long (shown). Ideally, allow 42 inches between the edge of the table and a wall or other obstruction so that there’s room to push back chairs and walk behind those who are seated. Intimate meals: A bistro set offers space-saving and portable lightweight seating for two, while a 42-inch round or square table provides enough elbow room for four. Entertaining with friends: Just as guests congregate in the indoor kitchen, they’ll gather around the grill outside. Give them a place to perch—and keep them out of the cooking zone—with a freestanding pub table and stools. For built-in kitchens with a peninsula or for grill islands, add a breakfast-bar-style overhang that’s 15 inches deep for a 36-inch high counter, or 12 inches for a 42-inch one, to allow enough space for knees.
8. Make a three-prong lighting plan
Provide task lighting, such as a clip-on grill light or a standing lamp, for cooking and work areas. Ambient illumination at seating areas, in the form of all-weather string lights or rechargeable LED tea lights, will set the mood. And, for safety, consider spots or solar-powered stakes along paths leading to your open-air kitchen, riser lights for deck stairs, and an overhead lantern where you enter the house.
9. Have a winterizing plan
When temperatures get near freezing, you may need to close up shop for the winter. Here’s how:
:no_upscale()/cdn.vox-cdn.com/uploads/chorus_asset/file/23643591/web_SAFETY.jpg)
:no_upscale()/cdn.vox-cdn.com/uploads/chorus_asset/file/23643603/web_H0504OUTDOORKITCHENS02.jpg)
:no_upscale()/cdn.vox-cdn.com/uploads/chorus_asset/file/23643608/web_5161Arterra.jpg)
:no_upscale()/cdn.vox-cdn.com/uploads/chorus_asset/file/23643632/web_ReadThis0619A.jpg)


:no_upscale()/cdn.vox-cdn.com/uploads/chorus_asset/file/23643682/web_marklohman1.jpg)
:no_upscale()/cdn.vox-cdn.com/uploads/chorus_asset/file/23643719/web_marklohman.jpg)
:no_upscale()/cdn.vox-cdn.com/uploads/chorus_asset/file/23664989/outdoor_kitchen_iStock_1297463797.jpg)
:no_upscale()/cdn.vox-cdn.com/uploads/chorus_asset/file/23664983/outdoor_kitchen_iStock_1312027291.jpg)
:no_upscale()/cdn.vox-cdn.com/uploads/chorus_asset/file/23643743/web_Pergola_EveningD_reduce.jpg)
:no_upscale()/cdn.vox-cdn.com/uploads/chorus_asset/file/23643747/web_thermo.jpg)